

Engine oil plays a crucial role in keeping a motorcycle’s engine running smoothly. It lubricates internal components, helps control friction and heat, and supports overall engine performance. If the oil level becomes too low or the oil is used beyond its recommended service interval, the engine may eventually suffer from increased wear.

The good news is that riders can perform a basic engine-oil check at home in just a few minutes. However, the exact oil-change interval should always be based on the motorcycle manufacturer’s owner’s manual.
How to Check Your Bike’s Engine Oil at Home
Start by parking the motorcycle on a flat and level surface. If the motorcycle has been running recently, allow the engine to cool for a few minutes. This gives the oil time to settle, although the exact checking procedure can vary between motorcycles.
Depending on the motorcycle, the oil level may be checked using a dipstick or an inspection window. If your bike has a dipstick, remove it carefully and wipe the oil off completely with a clean cloth or tissue.
Now insert the dipstick again according to the instructions in your owner’s manual and remove it. Check where the oil level sits between the MIN and MAX markings.
What the Oil Level Means
- Between MIN and MAX: The oil level is generally within the acceptable range.
- Close to MAX: The level is generally sufficient.
- Below MIN: The motorcycle may need oil added before riding, using the correct specification and quantity recommended by the manufacturer.
Avoid overfilling the engine, as excessive oil can also cause problems.
Check the Oil’s Condition
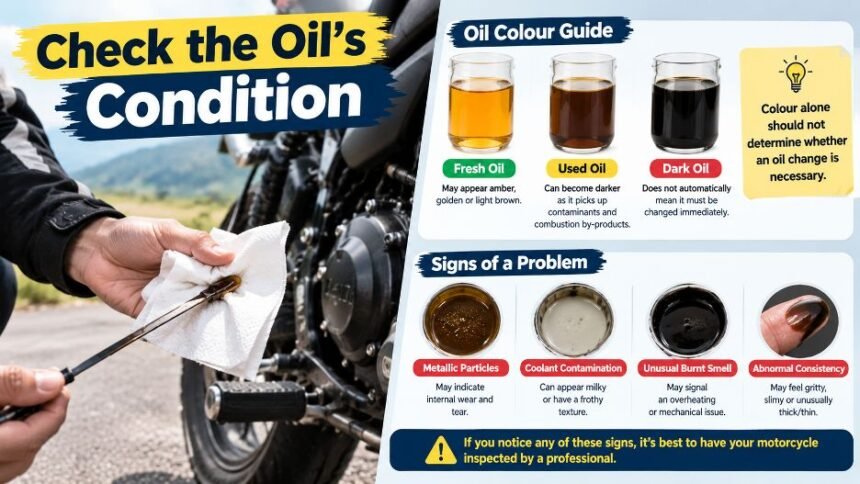
Oil level is only one part of the inspection. You can also look at the oil’s appearance and consistency, but colour alone should not determine whether an oil change is necessary.
Fresh motorcycle engine oil may appear amber, golden or light brown. During normal use, it can become darker as it picks up contaminants and combustion by-products. Therefore, dark oil does not automatically mean that it must be changed immediately.
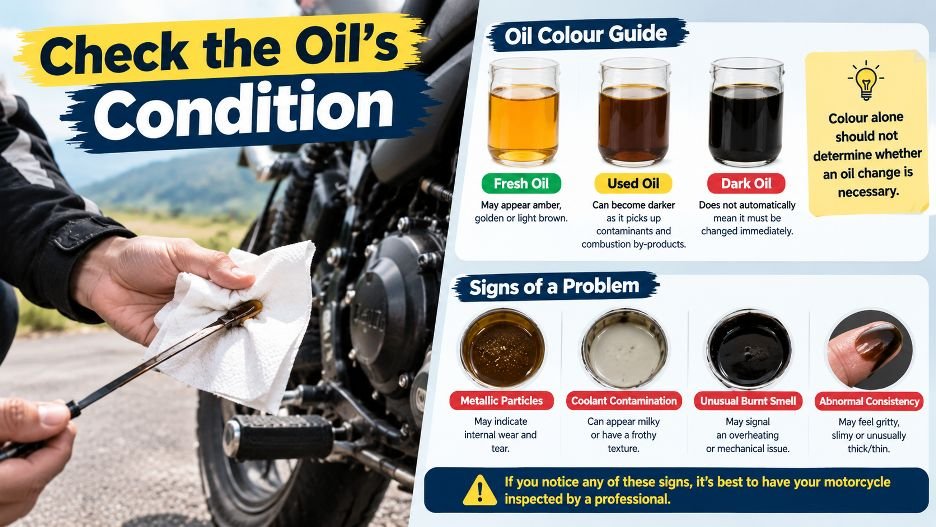
However, if the oil appears unusually contaminated, contains visible particles or feels abnormal, it is worth having the motorcycle inspected.
Riders should also check for signs of metallic particles, coolant contamination or an unusual burnt smell. Such symptoms can indicate a mechanical issue and may require professional inspection.
When Should You Change Motorcycle Engine Oil?
There is no single mileage figure that applies to every motorcycle. Oil-change intervals depend on the engine design, oil specification, riding conditions and manufacturer’s recommendations.
Some motorcycles may require an oil change around every 2,000–3,000 km, while others can go considerably longer. Frequent traffic riding, short trips, dusty conditions or demanding riding can also affect maintenance requirements.
Therefore, instead of following a fixed 2,000–3,000 km rule for every bike, riders should check the owner’s manual or official service schedule for the recommended interval.
Bottom Line
Checking your motorcycle’s engine oil at home is simple and can help identify low oil levels or obvious signs of contamination. But a quick dipstick inspection cannot replace the manufacturer’s service schedule.
For the best engine protection, maintain the correct oil level, use the recommended oil specification and replace the oil and filter at the intervals specified for your motorcycle.